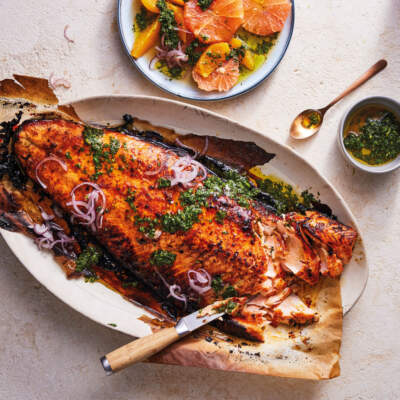
How to braai turkey
If you’re starting to plan your Christmas menu, chances are you’re wondering how to braai a turkey. Let’s be honest, this is no mean feat, but it’s not as scary as you think. We chatted to some local chefs and food writers to get their best tips for braaiing a turkey.
Building the right kind of braai
What type of braai is best?
“I think the best braai to use is a kettle braai. Attempting to braai a turkey over an open fire is very tricky, whereas a kettle braai offers a bit more control,” says David Higgs, chef and owner of Saint, Marble and now Zioux in Johannesburg. “Just make sure it’s big enough to fit the turkey! In terms of heat, you don’t need it to be too hot, ideally an even low and slow heat.” Food writer and cookbook author Georgia East echoes this: “I would only ever cook a turkey on a kettle braai – it just retains moisture that bit better.”
What kind of fire should I build?
Vusi Ndlovu, head chef and co-owner of EDGE in Franschhoek told us: “You need to achieve many small things to get a well-cooked bird. In terms of heat, you want to have a low zone and an intense zone. The idea is to hit the thighs and back with intense heat, then move over to the low zone and let it chill out there, ideally without the crown getting too much heat. This is repeated until we achieve the desired result,” he explains. “It’s like a sort of a dance that you have to do with the fire. Otherwise, you can bake it in a kettle braai on a foil tray with a liquid of your choice. But then I would put it under a hot grill at the end to give it some colour.”
Preparing the turkey
Should I brine my turkey?
“Brining your turkey before it goes onto the braai is always a good idea because it helps keep it moist and juicy – something that’s especially important in white meat,” says David. “Another nice way to retain that moisture is to rub butter under the skin – this could be flavoured (such as a truffle or honey butter). It’s also important to remember to season the bird all over, but especially in the cavity.” Karen Dudley, chef and cookbook author, agrees. “Brine is key! Let’s be honest, turkey is not the most exciting, so brine helps with juiciness and flavour.” She suggests making a brine of sugar, salt, ginger, orange and spices such as star anise.
What about trussing?
“I would be cautious about trussing, although it looks lovely once cooked, I often find the joints, especially in the legs are always slightly underdone,” says Vusi. “A good thermometer is key to ensure you have reached the right temp.” If you’re looking to maximise even cooking, Karen Dudley recommends spatchcocking the turkey instead of trussing it. “Spatchcocking ensures the whole turkey will cook at the same rate, plus it reduces the cooking time,” she explains.
Should I stuff the turkey?
The general consensus on stuffing a turkey, especially one going on the braai, is to proceed with caution. “I find stuffing hampers the cooking of the bird. It’s just another obstacle,” says Vusi. “If you’re cooking a bird with stuffing, you need to ensure that the stuffing is cooked as well as the bird. There are a lot of interesting versions of stuffing you can make separately and then serve alongside the turkey instead,” he adds. If you want to add a bit more flavour to the bird, David Higgs recommends stuffing the cavity with aromatics instead. “I’m not a fan of stuffings, so I prefer to stuff the cavity with lemon, herbs and lots of salt,” he says.
During the cooking process
Do I need to baste it while it cooks?
Emily Robinson, chef and founder of Eggs & Shoulders in Cape Town, says consistent basting can help prevent the meat from drying out. “Lean meat needs to be treated with lots of fat, so constant basting with butter can avoid anything drying out.” But be cautious of opening the lid too much as that can affect the overall heat within the braai. “Pack the coals around the side of the braai with nothing underneath except a bowl to catch juices that drip down,” adds Karen. “Leave it untouched, to cook low and slow to encourage that smokiness, then glaze it lots of butter and maple syrup.”
How long should cooking take?
“It’s tricky to say exactly because it depends on the size of the bird and the heat of the braai. If it’s a big turkey, you’re probably looking at around 3–4 hours,” says David. “When you’re getting near this cooking time, you can start checking by cutting into the dark leg meat and looking at the juices – if they’re clear, then you’re good to go. It’s also very important to rest the bird once it comes off the fire.” The best piece of cooking advice here is don’t overthink the braai aspect: “Treat it like you would if you were cooking it in the oven where a good strategy is the same as the braai – start it on a low temp (roughly 120–150ºC in an oven), then crank up the temp to add some colour by adjusting the vents,” says Vusi.
Other words of wisdom
Keep an eye on the heat
“Braais can be unpredictable so you need to make sure you keep an eye on it,” David told us. “If your braai doesn’t have a built-in thermometer, you can use the lid as a gauge. If the lid is too cool you know you need to open the vents, if it’s too hot to touch, then shut the vents down for a little bit.”
Consider a different approach to serving
“Between the defrosting, the brining and the cooking, you must accept that cooking a turkey takes time – don’t think of doing it last minute,” advises Karen. “You also don’t need to serve it hot! Cook it well ahead of your guests arriving to take the pressure off and serve it at room temperature,” she says. “Serve with hot gravy if you must, but on a hot summer’s day, it’s not necessary.” And the overarching advice when it comes to serving is to make sure you’ve given the bird a lot of time to rest before carving. “This also helps with juiciness and prevents dry meat,” says David.
Find our recipe for braaied turkey here and a simple step-by-step below.
Method
Light the Weber. While you’re waiting for the coals to burn down, prepare the turkey. Gently lift the skin from the breast and generously rub 200 g butter under the skin. Add a few rosemary sprigs and generously salt the skin.
The coals are ready when they turn grey and aren’t smoking anymore. Separate the coals and move to both sides of the Weber. Place a foil tray between the coals to catch the fat and juices from the turkey.
Place the turkey in the centre of the grid over the drip tray. Cover with the lid, ensuring the air vents are open. Roast for 11⁄2–2 hours. Melt 300 g butter with rosemary and baste the turkey with the butter every 15–20 minutes. Check after 1 1⁄2 hours and remove if cooked to keep the meat moist. When cooked, transfer to a board, cover with foil and allow to rest for 15 minutes.

Comments